
Greenplum Kerberos Guide
This guide was developed in collaboration with Zeb Bowden and the rest of the team at the Virginia Tech Transportation Institute.
This article includes the following sections:
- Conceptual Overview
- Kerberos Introduction
- Kerberos Implementations
- Kerberos Glossary
- GSSAPI
- Greenplum Kerberos Configuration
- Greenplum Kerberos Testing
- ODBC Configuration
- Authentication Delegation
- Conclusion
Conceptual Overview
Our primary goal when configuring Kerberos authentication is to enable single sign-on in the environment. That is, users should have to authenticate by providing a password once when they login to their workstation and should thereafter be able to access any system or service in the organization without ever re-authenticating.
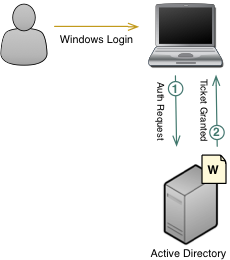
Throughout this guide we will be referring to the scenario where a user logs into their Windows workstation via Active Directory and then accesses a web service that pulls data from a Greenplum database. After logging into Windows, the user’s credentials should be passed through the web service to Greenplum without requiring the user to authenticate again. The following diagram illustrates the process from the user’s perspective:

Although this appears very simple to the user, the process behind the scenes is quite a bit more complicated. The first step is for the user to login to their Windows workstation by authenticating with Active Directory. After the user enters their password the system will authenticate them with AD, and if successful they will be given a Kerberos “ticket” that is stored on the client system and proves that their authentication was successful.
Before the user can access Greenplum they must get a second Kerberos ticket that allows them to authenticate with the database. This ticket is obtained automatically as soon they try to access the database, whether it be through a desktop application or a web service. The ticket they already received is used for authentication, so the user is not required to type in their password again.
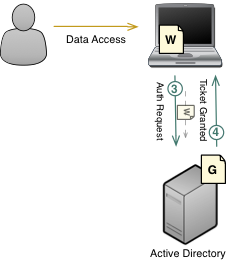
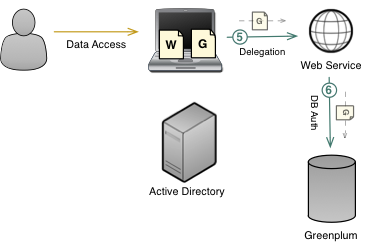
Once the user receives their Greenplum service ticket they can proceed by passing that ticket to the database. Greenplum will use the ticket to securely prove the user’s identity and allow them to login, but permissions to database objects will still be managed internally by the database. Note that the user can access the database directly using a client like PGAdmin, or an application or web service can use Kerberos delegation to pass the user’s ticket through to the database automatically as shown below:
Kerberos Introduction
Kerberos is a single sign-on protocol developed by researchers at MIT. It specifies how users or services can authenticate with a central service, and once authenticated can pass secure “tickets” amongst themselves to prove their respective identities. As described above, this protocol is commonly used in a Greenplum or PostgreSQL environment to allow users to automatically authenticate with the database without requiring them to provide any credentials such as a password.
Kerberos Implementations
There are two popular implementations of the Kerberos protocol widely used today. The first is MIT’s open source Kerberos implementation. The second is Microsoft Kerberos, which is provided by Active Directory. These systems are similar, since they both implement the same underlying protocol, but there are difference that could affect configuration. The examples in this guide assume Microsoft Kerberos is used as the KDC.
Glossary
The following terms are unique to the Kerberos protocol and should be understood before beginning configuration.
Ticket - A ticket is a secure, encrypted credential issued by a KDC or TGS that proves the identity of a user or service
Authentication Server (AS) - An Authentication Server is responsible for authenticating users via a password. If authentication is successful, the AS forwards requests to the KDC
Key Distribution Center (KDC) - A Key Distribution Center is a service responsible for issuing Ticket Granting Tickets
Ticket Granting Ticket (TGT) - A Ticket Granting Ticket is a special type of Ticket that proves a user has been authenticated with an Authentication Server
Ticket Granting Service (TGS) - A Ticket Granting Service receives user requests to access services, such as Greenplum. It first verifies users are authenticated via the user’s TGT, then grants them a Ticket for the requested service if the user is permitted to access it
Service Server (SS) - A Service Server is a server that provides a particular service. For example, the Greenplum master host is the SS for the Greenplum service
Principal - A Principal is a unique identifier for a given user or service. is typically takes the form of primary/instance@realm, for example dwoods/[email protected]
Service Principal Name (SPN) - A Service Principal Name maps a Kerberos principal to a service. For example, the gpadmin principal might be mapped to the postgres SPN
Certificate Cache (CC) - A local file store for Kerberos tickets that have been issues to a particular user. Typically a file in /tmp in Linux or an in-memory store on Windows
GSS-API
GSSAPI stands for Generic Security Services Application Program Interface and is a high level interface, or API, for accessing security services such as Kerberos. As discussed previously, all Kerberos implementations are all slightly different since the Kerberos API has not been standardized. By supporting and exposing GSSAPI, Kerberos implementations give clients and services a standard way to connect to and use Kerberos. GSSAPI should always be the preferred way to use Kerberos when available. Unfortunately GSSAPI is not supported by Greenplum at this time, so the Kerberos API must be used instead.
Greenplum Kerberos Configuration
This section will walk you through the process of configuring Kerberos authentication in Greenplum. To complete these steps you will need administrator level access to Active Directory and Greenplum. It is also recommended you have a third machine for testing client Kerberos connections. This guide was tested with Greenplum, but should work equally well with PostgreSQL.
Windows Configuration
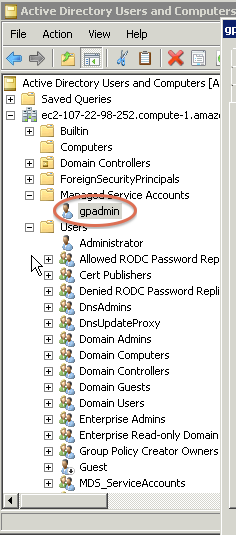
First, in the Active Directory Management Console add a new Managed Service Account named ‘gpadmin’. This account will be used by the Greenplum database to perform authentication.
In either Windows PowerShell or cmd.exe, use the setspn utility to associate a service called postgres with the Managed Service Account just created. Setting the GPMasterHostname correctly is very important. Be sure it is on the same network as the Active Directory server and that the hostname can be fully resolved. Test this using nslookup if you are unsure.
$ setspn -A postgres/<GPMasterHostname> gpadmin
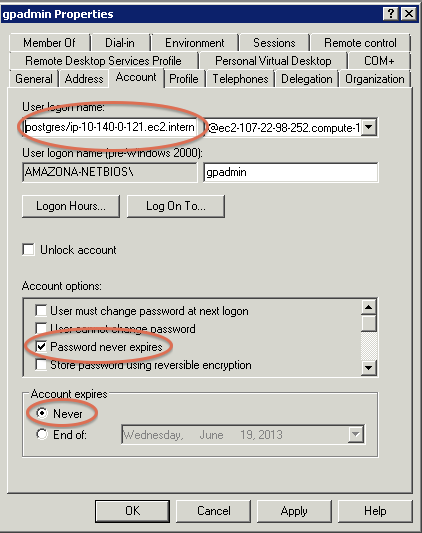
Once the Service Principal Name has been associated with the gpadmin account you can open the user properties in the Active Directory Management Console to verify the User Login is set correctly and that the password for the gpadmin account never expires.
Next, export a key file that the Greenplum service can use to authenticate with Kerberos using the ktpass utility from Windows PowerShell. This will allow Greenplum to acquire a Ticket from Kerberos without a password when the database is started.
$ ktpass -out greenplum.keytab -princ postgres/<masterHost>@<domain> -mapUser gpadmin -pass Greenplum1 -crypto DES-CBC-MD5
Note that the encryption type specified with the -crypto parameter may vary depending on your version and site specific configuration of Active Directory.
Put the generated key file on the GP master where it can be accessed by the gpadmin user. $MASTER_DATA_DIRECTORY/kerberos.keytab may be a good choice, but be sure it is owned by gpadmin, that it also located in the same place on your standby master, and that it is backed up properly.
NTP Synchronization
It is important that system times on the Active Directory and Greenplum servers not be more than 5 minutes apart. It is suggested that you use Network Time Protocol (NTP) to keep the server times in sync. On the Greenplum master you can configure this through /etc/ntp.conf, but keep in mind that the master system clock must also be synced with all of the segment hosts.
Greenplum Server Configuration
The following steps should all be done on the Greenplum Master server as well as the Standby Master. All modified configuration files should be backed up regularly.
Make the following changes to Greenplum’s global configuration file, which can be found at $MASTER_DATA_DIRECTORY/postgresql.conf
krb_server_keyfile = '<location of key file>'
krb_srvname = 'postgres'
Add the following variables to GPAdmin’s environment by modifying /home/gpadmin/.bashrc
export KRB5_KTNAME=<location of key file>
export KRB5_TRACE=/tmp/krb5_gp.log
Note that the second environment variable, KRB5_TRACE, is used only for debugging purposes and can be removed at the administrator’s discretion.
Make the following changes to the system Kerberos configuration file located at /etc/krb5.conf
[libdefaults]
 debug=true
 default_etypes = rc4-hmac
 default_realm = <Realm>
 allow_weak_crypto = 1
 dns_lookup_realm = false
 dns_lookup_kdc = false
 forwardable = yes

[realms]
 <Realm> = {
  kdc = <KDCHostname>:88
  admin_server = <KDCHostname>:749
 }

[domain_realm]
 <KDCHostname> = <Realm>
 .<KDCHostname> = <Realm>
 .<otherDomain> = <Realm>
The following values are examples of what might go in the above configuration:
- <Realm> = EC2-107-22-98-252.COMPUTE-1.AMAZONAWS.COM
- <KDCHostname> = ec2-107-22-98-252.compute-1.amazonaws.com
- <otherDomain> = .ec2.internal
Make sure that any users who should authenticate through Kerberos exist in the database. Also be sure each user exists in Active Directory. See the Greenplum LDAP Guide for a solution to synchronize Active Directory users with the database.
demo=# create user testuser;
demo=# select * from pg_user where usename='testuser';
usename  | usesysid | usecreatedb | usesuper | usecatupd |  passwd  | valuntil | useconfig
----------+----------+-------------+----------+-----------+----------+----------+-----------
 testuser |    17774 | f           | f        | f         | ******** |          |
(1 row)
All authentication in Greenplum is configured through a file called pg_hba.conf located in Greenplum’s $MASTER_DATA_DIRECTORY. Once your users exist in the database you must also add them to this file to enforce Kerberos authentication. The following is an example of what your pg_hba.conf entry should look like:
host all testuser,myuser 0.0.0.0/0 krb5 include_realm=0
User names can be separated by commas if you have more than one to add, or you can specify that an entire group should authenticate with Kerberos by using the @groupname syntax:
host all @kerberos_group 0.0.0.0/0 krb5 include_realm=0
Also be sure to specify a valid IP address range for connection, 0.0.0.0/0 should be used for testing purposes only.
After all of the above Greenplum configuration changes are complete you should conclude by restarting the database using gpstop and gpstart.
Testing
Once the database restart is complete you can begin testing your configuration. Use the klist utility on the master to verify gpadmin has authenticated with Kerbers and has acquired a Ticket Granting Ticket, krbtgt, and a service ticket for postgres.
$ klist
Ticket cache: FILE:/tmp/krb5cc_500
Default principal: [email protected]

Valid starting     Expires            Service principal
05/17/13 11:38:50  05/17/13 21:39:02  krbtgt/EC2-107-22-98-252.COMPUTE-1.AMAZONAWS.COM@EC2-107-22-98-252.COMPUTE-1.AMAZONAWS.COM
    renew until 05/18/13 11:38:50
05/17/13 11:39:05  05/17/13 21:39:02  postgres/ip-10-140-0-121.ec2.internal@EC2-107-22-98-252.COMPUTE-1.AMAZONAWS.COM
    renew until 05/18/13 11:38:50
Next you should attempt to make a connection to the database from a different machine. Be sure the machine you use for testing has connectivity to both Active Directory and Greenplum, has Kerberos utilities installed, and has the same krb5.conf configuration as the Greenplum master.
Start by authenticating the database user you want to test with Kerberos.
$ kdestroy
$ klist
klist: No credentials cache found (ticket cache FILE:/tmp/krb5cc_0)
$ kinit testuser
Password for [email protected]:
$ klist
Ticket cache: FILE:/tmp/krb5cc_0
Default principal: [email protected]

Valid starting     Expires            Service principal
05/20/13 22:28:24  05/21/13 08:27:53  krbtgt/EC2-107-22-98-252.COMPUTE-1.AMAZONAWS.COM@EC2-107-22-98-252.COMPUTE-1.AMAZONAWS.COM
    renew until 05/21/13 22:28:24
Once the user is authenticated with Kerberos and has been granted a Ticket Granting Ticket, krbtgt, you can test using the same user to connect to Greenplum.
$ psql -U testuser -h 10.140.0.121 -d demo
Type "help" for help.

demo=>
Note that you should not be prompted for a password when connecting. After connecting successfully you can further verify authentication is working properly by checking that the user was granted an additional ticket for the postgres service:
$ klist
Ticket cache: FILE:/tmp/krb5cc_0
Default principal: [email protected]

Valid starting     Expires            Service principal
05/20/13 22:28:24  05/21/13 08:27:53  krbtgt/EC2-107-22-98-252.COMPUTE-1.AMAZONAWS.COM@EC2-107-22-98-252.COMPUTE-1.AMAZONAWS.COM
    renew until 05/21/13 22:28:24
05/20/13 22:28:07  05/21/13 08:27:53  postgres/ip-10-140-0-121.ec2.internal@EC2-107-22-98-252.COMPUTE-1.AMAZONAWS.COM
    renew until 05/21/13 22:28:24
ODBC Configuration
At this point we have configured Greenplum and Active Directory for Kerberos authentication and have proven clients can successfully connect using the native psql utility. The next step is to allow users to connect through tools or applications by configuring ODBC on the client machines.
The ODBC driver you choose to use must support the krb5 protocol. In the following examples we will use the Greenplum ODBC driver provided by the greenplum-connectivity package, but the open source psqlODBC driver should work as well. Note that the Greenplum ODBC driver provided by DataDirect does not support Kerberos authentication.
Linux
First, download the latest greenplum-connectivity package and install it on the client system using the included documentation. Once installed you should create an odbc.ini file and an entry for your Greenplum cluster. The following is an example of what that entry should look like:
[GP]
Description         = Test to Greenplum
Driver              = /usr/local/greenplum-connectivity/drivers/odbc/psqlodbc-09.00.0200/unixodbc-2.2.12/psqlodbcw.so
Trace               = 1
Debug               = 1
TraceFile           = /home/gpadmin/sql.log
Database            = demo
Servername          = 10.140.0.121
UserName            =
Password            =
Port                = 5432
Protocol            = 7.4-1
ReadOnly            = No
RowVersioning       = No
ShowSystemTables    = Yes
ShowOidColumn       = No
FakeOidIndex        = No
useDeclareFetch     = 1
Fetch               = 4096
ConnSettings        =
Make sure your $ODBCINI environment variable points to the odbc.ini file you just created:
$ export ODBCINI=/home/gpadmin/odbc.ini
Also be sure to source greenplum_connectivity_path.sh. For continued use this line should be added to the user’s .bashrc:
$ source /usr/local/greenplum-connectivity/greenplum_connectivity_path.sh
Authenticate with Kerberos and verify you received a Ticket Granting Ticket as described in the Testing section above. Finally, test that the ODBC connection is working by using the isql utility.
$ isql -3 GP testuser
+---------------------------------------+
| Connected!                            |
|                                       |
| sql-statement                         |
| help [tablename]                      |
| quit                                  |
|                                       |
+---------------------------------------+
SQL>
Note that we passed the parameter -3 to tell isql to use ODBC 3 calls and the GP parameter so isql would use that entry from our odbc.ini.
You are now ready to connect any Linux tools or applications to Greenplum using this ODBC driver. All database connections will use Kerberos and authenticate using the local user’s TGT.
Windows
Similarly, you can configure an ODBC driver in any Windows environment to allow Windows based tools or applications to connect to the database. As with the Linux configuration, first download and install the latest greenplum-connectivity package for Windows. After it is installed you must configure a DSN for Greenplum using Microsoft’s ODBC Data Source Administrator utility. Note that the Greenplum Windows ODBC driver is 32 bit, so the 32 bit version of Data Source Administrator must be used. On a 64 bit Windows system the 64 bit Data Source Administrator will be opened by default and you will not be able to configure the Greenplum driver. The 32 bit version can be accessed by running the following command:
c:\Windows\SysWOW64\odbcad32.exe
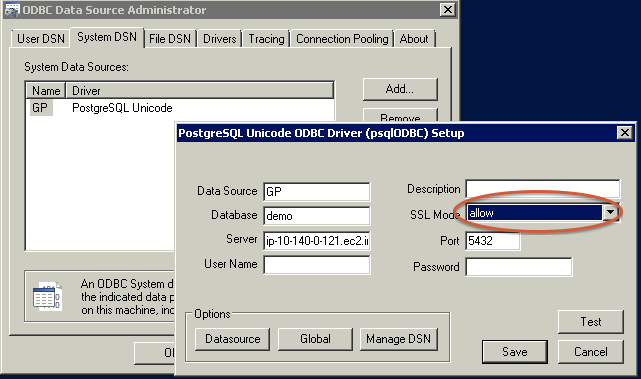
Choose the “PostgreSQL Unicode” driver when adding the DSN and then proceed with configuring it with your cluster details. Be sure the “SSL Mode” option is set to “allow”.
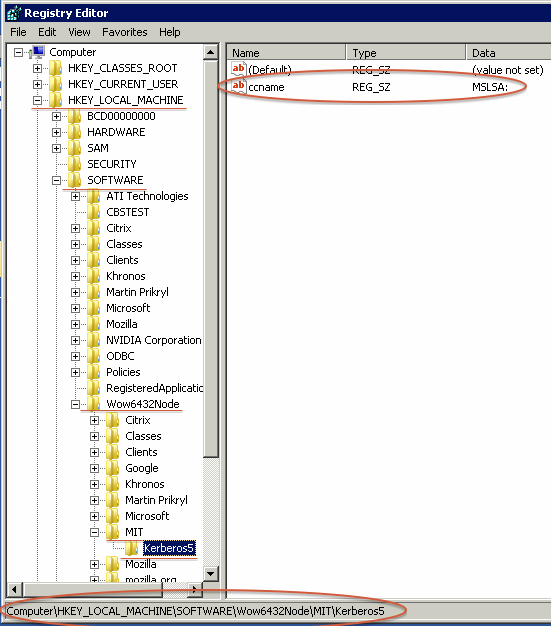
Add a new Windows Registry Key to tell the ODBC driver how to access the Certificate Cache. The key should be located in \HKLM\SOFTWARE\Wow6432Node\MIT\Kerberos5. It should have the name ‘ccname’ and should be of type REG_SZ. The value should be ‘MSLSA:’, which stands for the Microsoft Local Security Authority.
Once configured you should be able to login to the Windows system using a database user account and press the “Test” button in the above Setup dialogue box to verify the connection is working.
Application Authentication Delegation
It is common for an internal application or web service to connect to the Greenplum database using an application or service account. For example, a BI tool like Cognos might handle end-user authentication itself and always connect to the database using a special ‘cognos’ user in Greenplum.

Although this works in the majority of cases, it may sometimes be advantageous to pass the responsibility of user authentication through to the database. In this scenario the application or web service will receive the user’s TGT and pass it on to Greenplum instead of authenticating the user itself. This process is know as Kerberos Delegation.

Since the database authenticates each user directly this method allows for much more fine grained access control of database objects. It also eliminates the need to create or maintain application accounts. The downside to this approach is that the application loses some control over the uesrs connecting to it. It can’t employ user specific logic or access control.
To use Kerberos Delegation you need only make sure the users and services involved are given delegation permission in Active Directory. This is typically the default setting for users and setspn should automatically enable delegation for Managed Service Accounts, but if you run into problems on this step you may need to explicitly enable delegation.
Testing
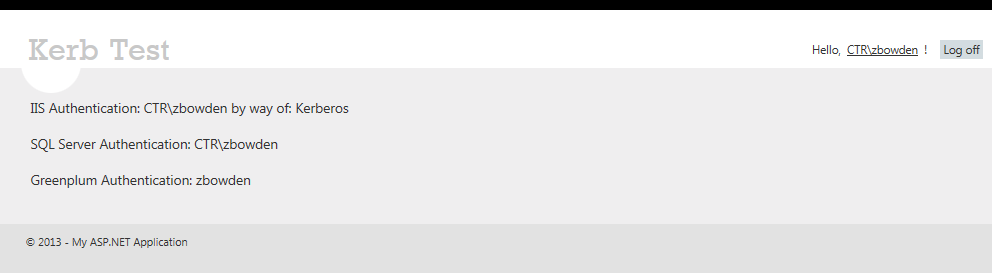
To test Kerberos Delegation, create and deploy a simple IIS web application that uses a system ODBC DSN to make a connection to Greenplum and displays the name of the connected user. When users access that web application from their desktops they should see their username displayed as the user making the connection. The currently connected user can be displayed with the following simple SQL statement after connecting:
SELECT current_user;
Zeb Bowden has created an excellent test application called KerbTest that is freely available on GitHub. As described above, it can be deployed to an IIS server and if Kerberos delegation has been configured properly it will display the name of the end user accessing the application. Complete instructions for use are included in the README.txt available at the GitHub repo.
Conclusion
Enabling Kerberos authentication in Greenplum is an easy way to provide database connectivity in your existing Single Sign-On infrastructure. It simplifies Greenplum configuration since passwords need not be managed by the database, and when combined with Active Directory Synchronization database users can be managed almost entirely without DBA intervention. Further, applications and services in your organizations can delegate their authentication to Greenplum to simplify application development.