
Connecting SQLFire to Greenplum
Companies trying to Enable Big Data Science know that their strategy needs to include both a real time memory grid as well as a long term analytics platform. Many products on the market today fill these individual niches, but rolling data from the real time system to the analytics platform efficiently is often a pain point that companies struggle with. This guide will describe a method for moving data from SQLFire to Greenplum in the most reliable and efficient way possible.
This article includes the following sections:
Conceptual Overview
This method takes advantage of SQLFire’s AsyncEventListener functionality. As the name implies, an AsyncEventListener is a Java class running in a dedicated thread which is notified asynchronously whenever a DML event on a registered table occurs. In our case, the AsyncEventListener callback is triggered any time a new row is inserted into the table we wish to replicate.
Using the SQLFire RabbitMQ AsyncEventListener we will take each new row inserted into the table and add it to a RabbitMQ exchange. Once the new rows are in the message queue, we can wait until the number of rows reaches a certain threshold before loading them all into Greenplum in a single batch using the RabbitMQ Greenplum Loader. This batch loading process takes full advantage of Greenplum’s parallel loading technology and will prevent overloading the cluster with single row insert statements.
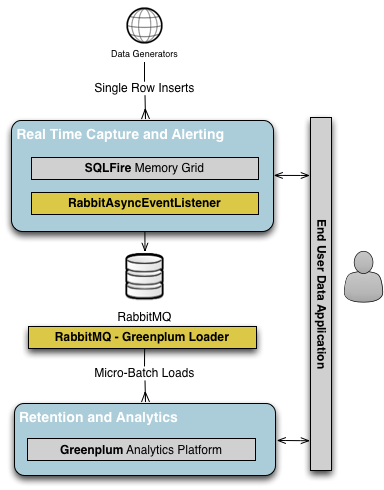
This architecture, shown below, allows us to get the maximum benefit from both technologies. Individual rows of data can be loaded into SQLFire in real time, and applications can choose to use SQLFire for real time data access or to use Greenplum for analytics on much larger data sets when their use case isn’t as time sensitive.
Required Components
The following software components are required to setup this solution:
SQLFire Setup
First we must setup and install our AsyncEventListener in the SQLFire system. Begin by downloading the SQLFire RabbitMQ AsyncEventListener and verifying the included RabbitAsyncEventListener.jar is in a location where the user running the SQLFire processes on each node can access it. Also make sure sqlfire.jar is added to the user’s $CLASSPATH.
$ export CLASSPATH=$CLASSPATH:/opt/sqlfire/lib/sqlfire.jar
Download and install the RabbitMQ Java Client library and make sure rabbit-client.jar is also in your $CLASSPATH:
$ export CLASSPATH=$CLASSPATH:/opt/rabbitmq-java-client-bin/rabbitmq-client.jar
When you start your SQLFire listeners and servers, be sure you include the -classpath option pointing to RabbitAsyncEventListener.jar:
$ sqlf locator start \
    -dir=/data/sqlfire/locator \
    . . . \
    -classpath=/home/dwoods/sqlfire-rabbitmq-asynceventlistener/jar/RabbitAsyncEventListener.jar

$ sqlf server start \
    -dir=/data/sqlfire/server \
    . . . \
    -classpath=/home/dwoods/sqlfire-rabbitmq-asynceventlistener/jar/RabbitAsyncEventListener.jar
Add RabbitAsyncEventListener to SQLFire, being sure to pass in the correct RabbitMQ URI to INITPARAMS:
CREATE ASYNCEVENTLISTENER RabbitAsyncEventListener (
    listenerclass 'sqlfire.callbacks.RabbitAsyncEventListener'
    INITPARAMS 'amqp://guest:guest@localhost:5672'
) SERVER GROUPS( SG1 );
Start the RabbitAsyncEventListener we just added. Note that this step can be done before or after we add the AsyncEventListener to our table:
call SYS.START_ASYNC_EVENT_LISTENER( 'RabbitAsyncEventListener' );
Finally, register the RabbitAsyncEventListener to a new table, or register it to an existing table using ALTER. Our example will use a simple table named sqlf_rabbit_test which contains three columns:
CREATE TABLE sqlf_rabbit_test(
    id int not null,
    kind varchar(64),
    color varchar(64)
) SERVER GROUPS(
    ...
) AsyncEventListener(
    RabbitAsyncEventListener
);
As soon as the RabbitAsyncEventListener is started and registered it will begin publishing new messages to the RabbitMQ exchange named sqlfire with the routing key of schemaname.tablename. This will allow any RabbitMQ consumers we want to build to selectively choose which SQLFire tables they want to deal with.
We can see the SQLFire to RabbitMQ transfer in action by inserting four simple rows into our SQLFire table:
insert into sqlf_rabbit_test values( 1, 'dog', 'green' );
insert into sqlf_rabbit_test values( 2, 'cat', 'blue' );
insert into sqlf_rabbit_test values( 3, 'dog', 'red' );
insert into sqlf_rabbit_test values( 4, 'cat', 'yellow' );
Make sure all rows were added to the SQLFire table:
sqlf> select * from sqlf_rabbit_test;
ID         |KIND          |COLOR
--------------------------------
4          |cat           |yellow
3          |dog           |red
2          |cat           |blue
1          |dog           |green

4 rows selected
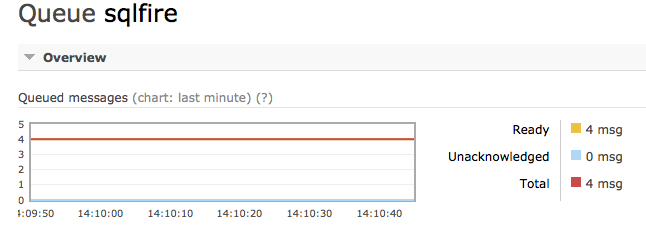
We can then use the RabbitMQ Management Plugin to verify the four rows were added to the correct exchange:
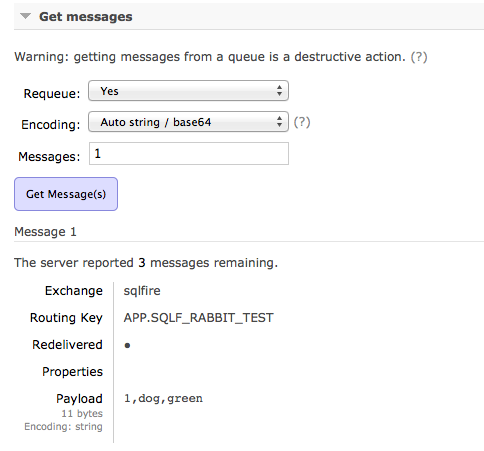
We can also inspect one of the messages to verify the body contains the new row and it was added with the proper routing key:
Greenplum Setup
Now that all new rows being added the SQLFire table are being propagated to a RabbitMQ exchange we can begin the process of batch loading those new rows into our Greenplum cluster. Note that unlike SQLFire, Greenplum was not built to handle massive numbers of single row inserts, so loading batches of rows at a time is always preferable with large data volumes.
First download and install the RabbitMQ Greenplum Loader on a server that has network access to RabbitMQ as well as direct access to all the Greenplum segments. It is important to remember that we will be loading directly into the Greenplum segments in parallel to optimize our loading speed.
RabbitMQ Greenplum Loader is a Python program that requires the following Python libraries to be installed in the environment:
The main program is called rgload.py and it can be added to your path if desired:
$ export PATH=$PATH:bin/rgload.py
Create a configuration file that instructs rgload.py how to perform your loads using the provided sample.ini file as a template. Most options specify how to connect to each system, but pay particular attention to the following configuration options:
- rgload.maxrows - Controls the load batch size, or the number of rows to load from RabbitMQ into Greenplum at one time. The number of rows you choose will depend on the volume of rows being loaded into SQLFire and your tolerance for latency between the time the row is inserted and when it is available in Greenplum. Always set this to the highest number you can tolerate in your environment
- rabbitmq.route - Specifies the SQLFire table you want to replicate to Greenplum. The RabbitAsyncEventListener will queue rows from each table with a different routing key. If you have more than one table you want to replicate then you can start multiple copies of rgload.py
- greenplum.table - This is the Greenplum table you want to load the rows into. The table and column names do not have to match, but the number and types of the Greenplum columns must match the SQLFire table
Now you can start gpfdist on the RabbitMQ Greenplum Loader server pointing to whichever directory you specified in your configuration file:
$ gpfdist -d /path/to/data -p 8080 -l /path/to/data/gpfdist.log &
You can now start the rgload.py utility, which will immediately being monitoring RabbitMQ and issuing Greenplum load jobs as specified. When we start rgload.py we should see the following expected output:
$ python bin/rgload.py -c test.ini
2013-08-08 14:44:57,309:48262-[INFO]:-Connecting to 172.16.81.133:5672
2013-08-08 14:44:57,360:48262-[INFO]:-Established RabbitMQ connection
2013-08-08 14:44:57,397:48262-[INFO]:-[c]: Greenplum consumer started
We can return to SQLFire and again issue the same set of four insert statements:
insert into sqlf_rabbit_test values( 1, 'dog', 'green' );
insert into sqlf_rabbit_test values( 2, 'cat', 'blue' );
insert into sqlf_rabbit_test values( 3, 'dog', 'red' );
insert into sqlf_rabbit_test values( 4, 'cat', 'yellow' );
Assuming we set rgload.maxrows to 4 (much too low in practice) we would simultaneously see the following output from rgload.py:
$ python bin/rgload.py -c test.ini
2013-08-08 14:55:09,476:48819-[INFO]:-Connecting to 172.16.81.133:5672
2013-08-08 14:55:09,528:48819-[INFO]:-Established RabbitMQ connection
2013-08-08 14:55:09,529:48819-[INFO]:-[c]: Greenplum consumer started
2013-08-08 14:55:12,011:48819-[INFO]:-[c]: Starting Greenplum loader process
2013-08-08 14:55:12,017:48821-[INFO]:-[1407d363-51ae-4584-a428-ee7f0da9c7a6]: Starting load
2013-08-08 14:55:12,121:48821-[INFO]:-[1407d363-51ae-4584-a428-ee7f0da9c7a6]: Load complete
Finally we can do a SELECT from our Greenplum table to see that the expected rows were added correctly:
demo=# select * from sqlf_rabbit_test;
 id | type | color
----+------+--------
  1 | dog  | green
  2 | cat  | blue
  3 | dog  | red
  4 | cat  | yellow
(4 rows)
Conclusion
We now have a system for automatically moving rows from a SQLFire memory grid to a Greenplum analytics cluster. Our solution is as efficient as possible because SQLFire is asynchronously notifying our listener when new rows are inserted and we are queuing the new rows in a reliable way before batch loading them into Greenplum. Applications can choose whether to use SQLFire for real time querying and alerting, or to use Greenplum for heavy duty analytics. Administrators will not have to worry about manually ensuring consistency between the two systems, and developers will not have to worry about which data is located in which system.